Building an application for custom mapping of tickets in Zoho Desk
The use case requires building a custom application that can assign tickets to respective departments in Zoho Desk based on the subject line or the content of the body of the email. This can be extended to similar scenarios like:
- Assigning tickets to agents based on custom criteria
- Updating status of tickets based on criteria
- Assigning a case record in CRM to a case owner Solution Diagram
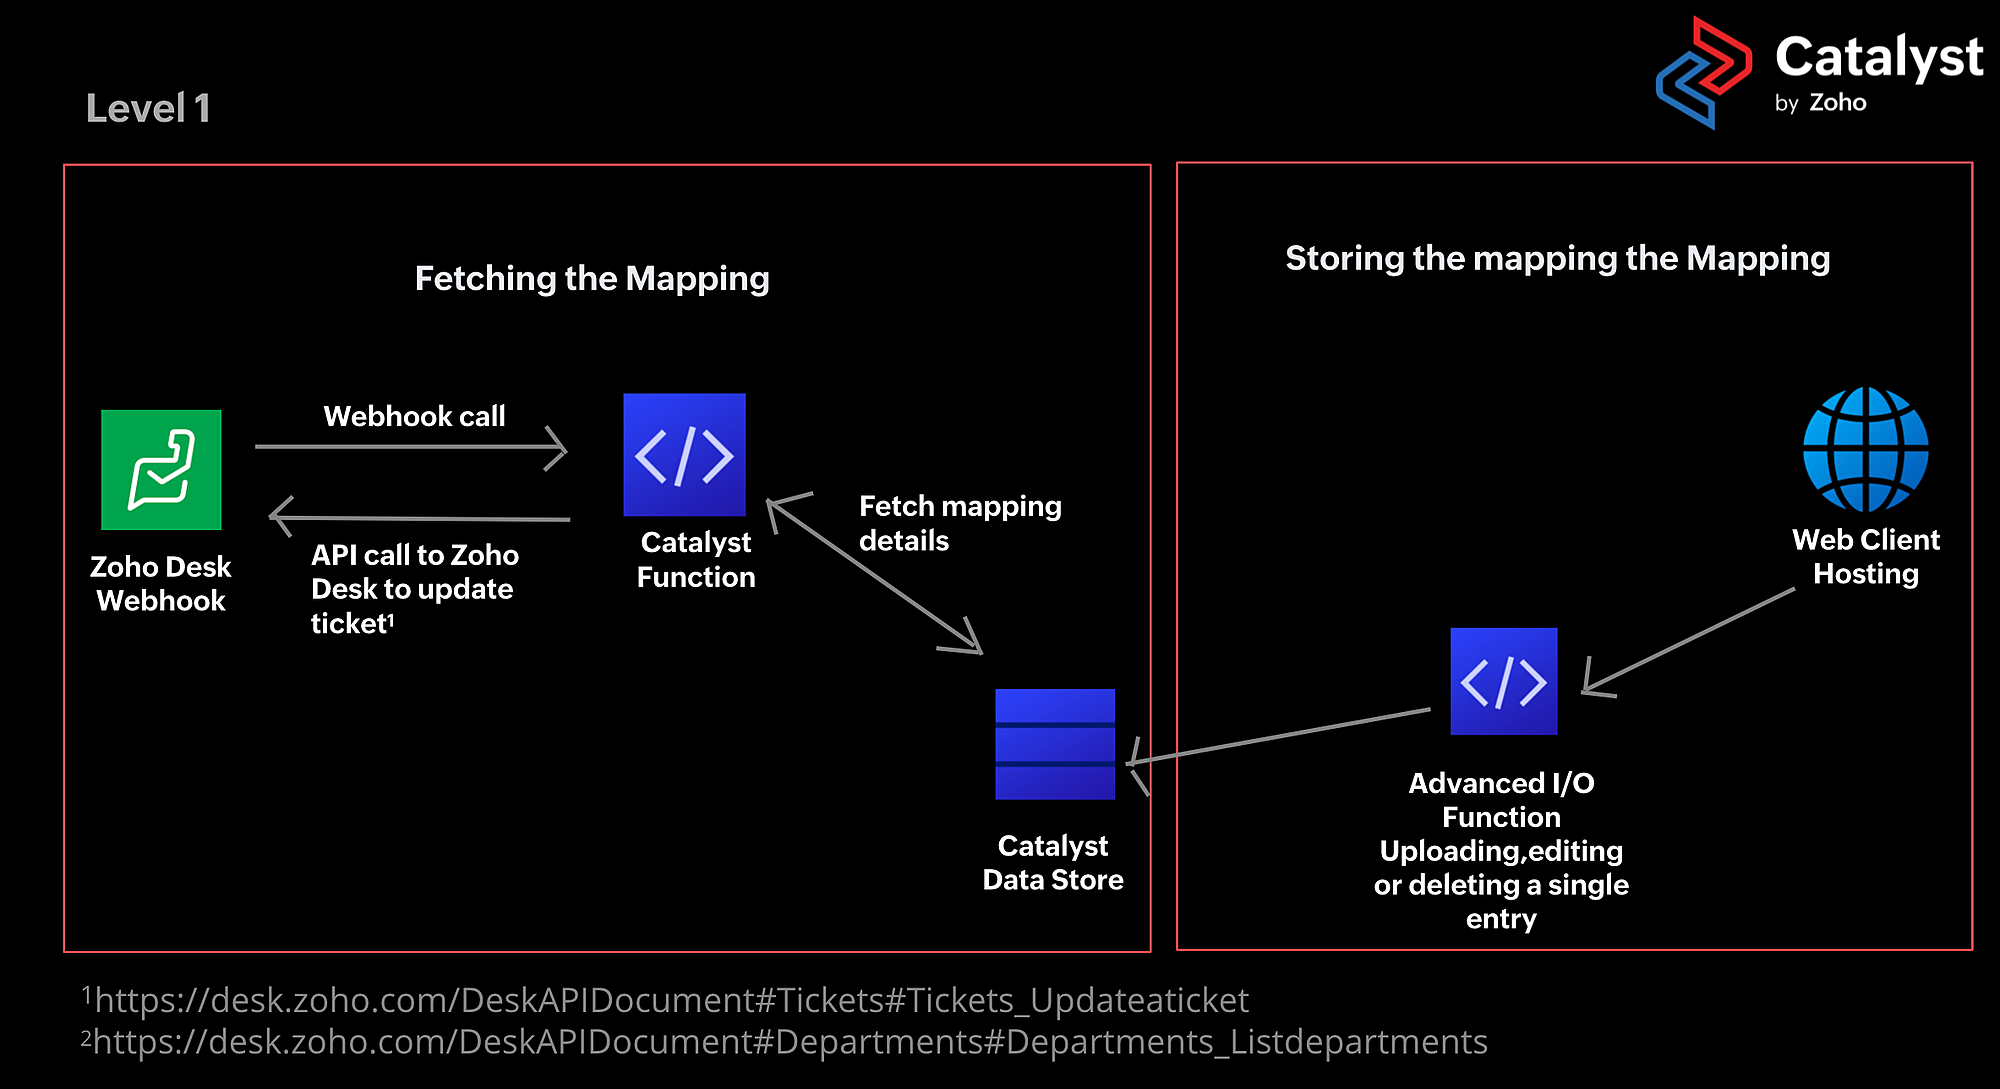
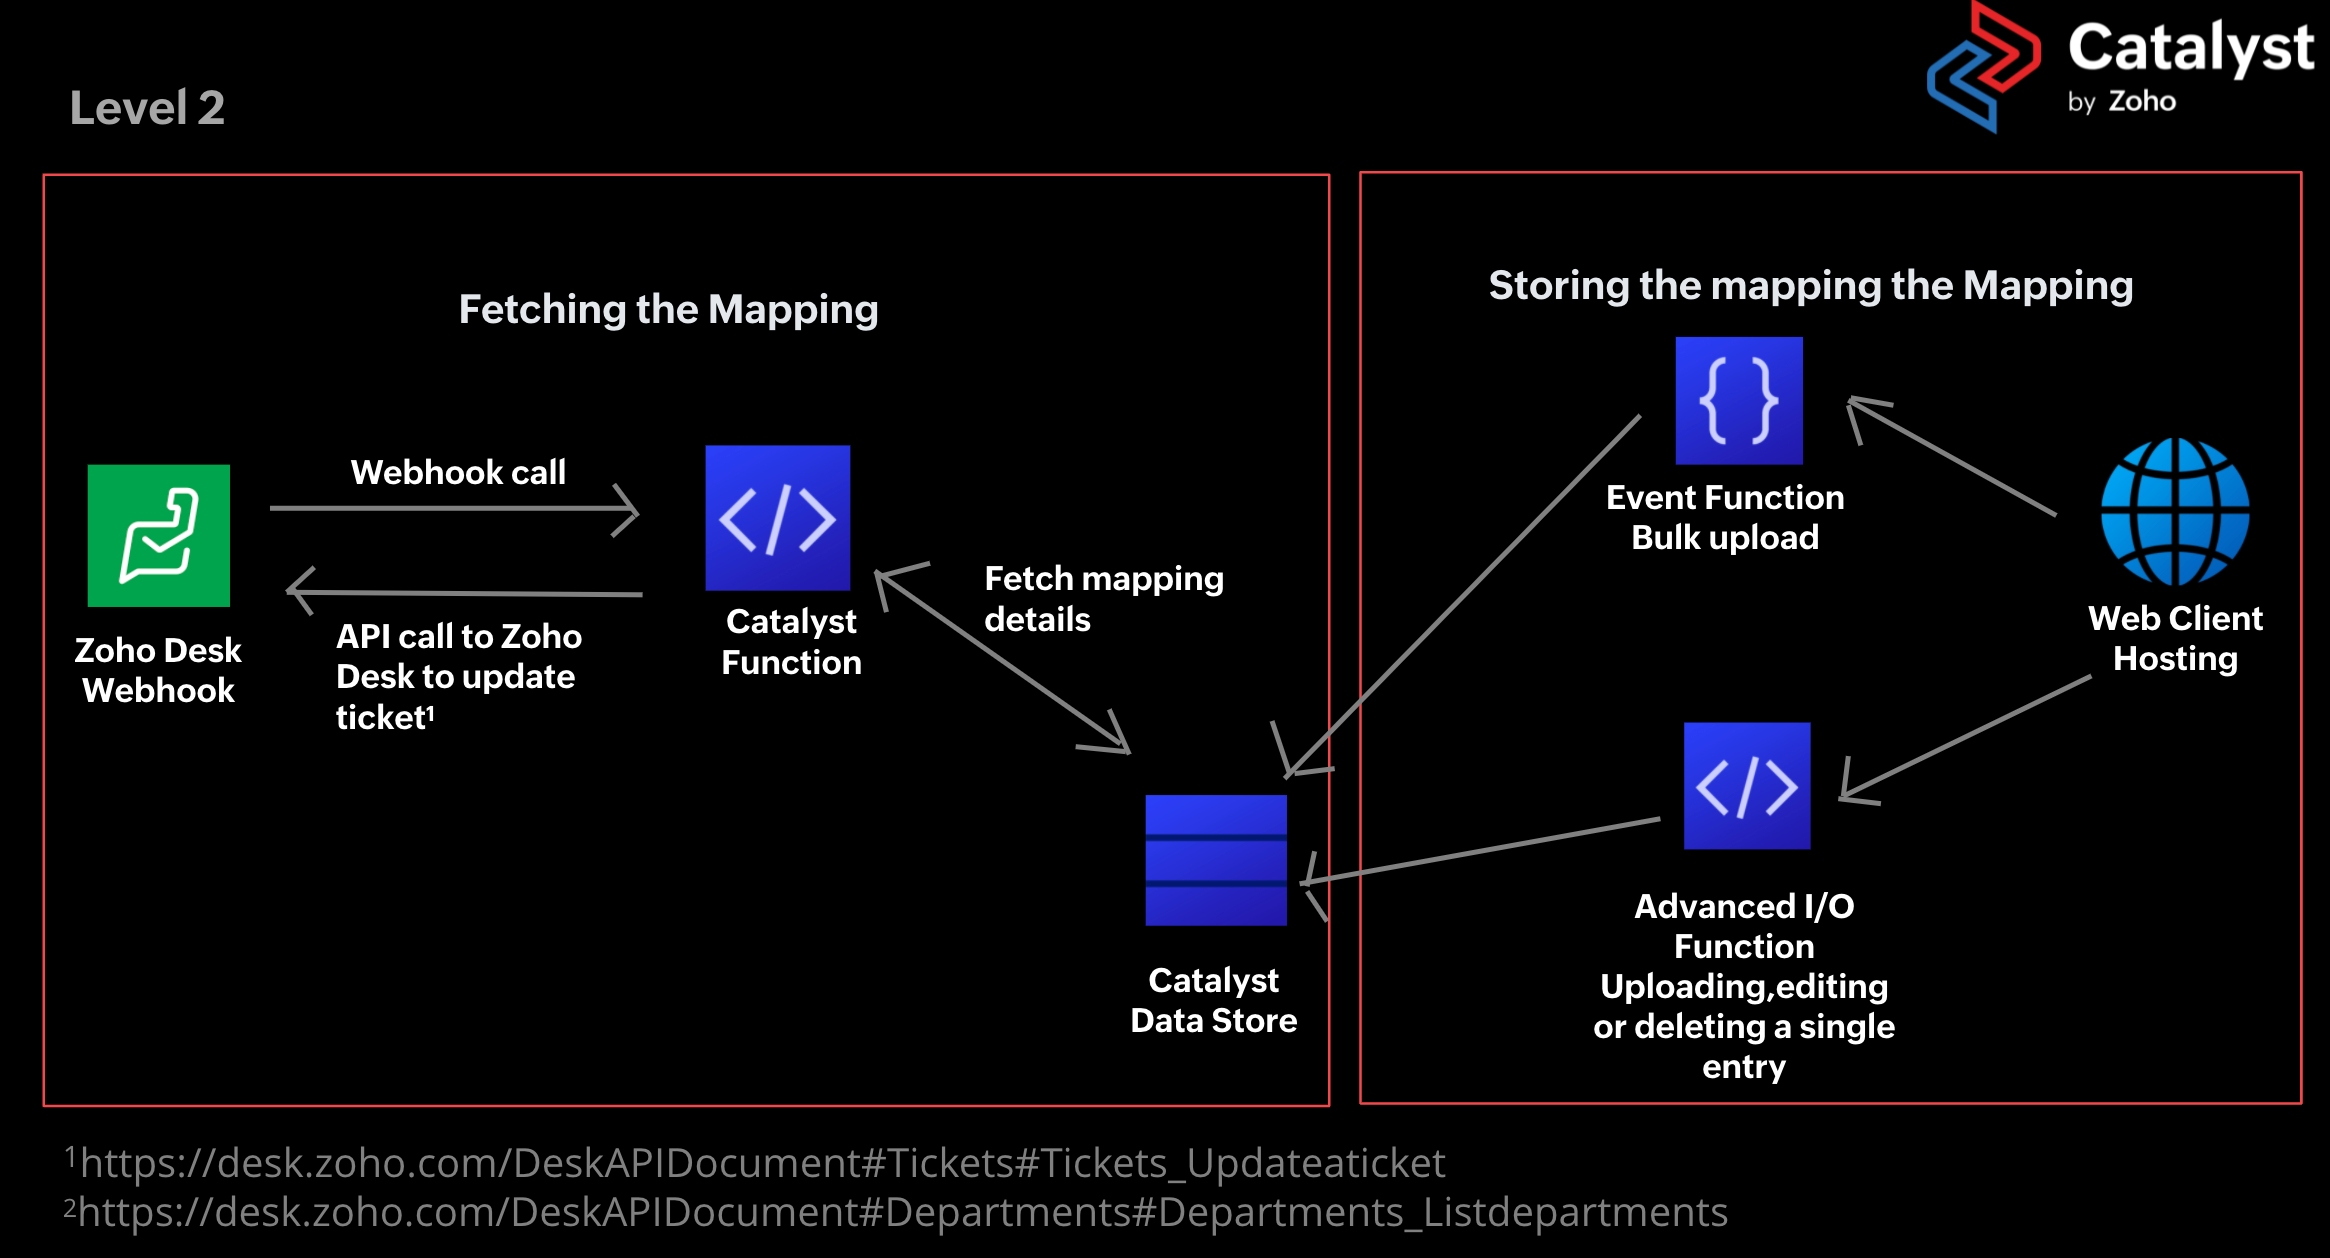
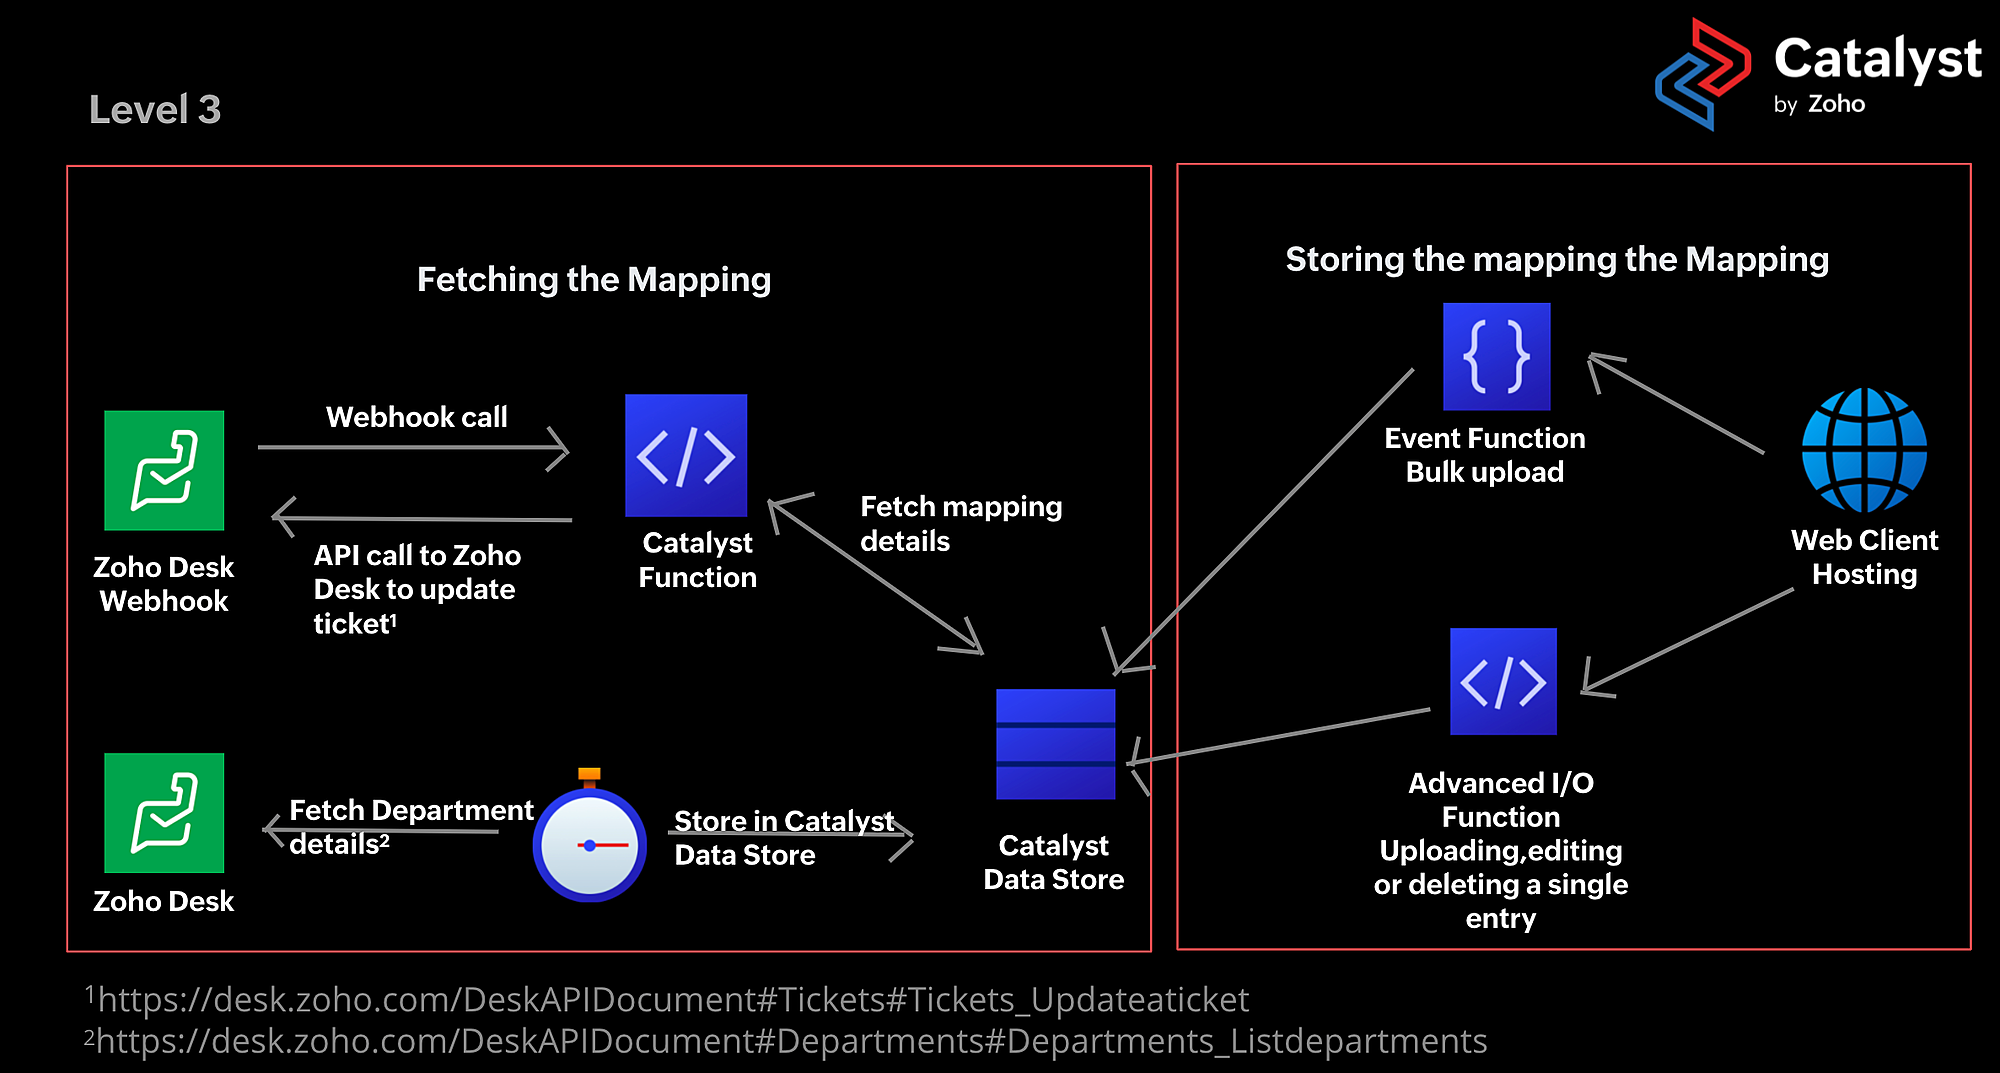
Solution Diagram:
 Level 1 : Uploading mappings one-by-one
 Level 2 : Upload mappings using a csv
 Level 3: Sync department details to Catalyst Data Store
Step 1: Database Schema
The Catalyst Data Store is a relational database that can store the mappings. The first step would be the setting up of the respective tables in the Catalyst Data Store. We'd definitely need a table to set up the OrderID, and department details mapping. Next, we set up the columns for the MappingTable. We've created two columns, OrderID and Team. We'd recommend setting up constraints like unique and mandatory if possible. Every table in the Catalyst Data Store will contain the ROWID, CREEATORID, CREATEDTIME, and MODIFIEDTIME columns by default.
Next, we create a Department table where we store the mapping between the DepartmentID and the DepartmentName. We do this because Desk APIs accept DepartmentID as input whereas the end-user will be typing in Department names.
For more information, please check the attachments.
Step 2: Setting up the functions
Functions perform the compute operation in our project. We will use only the Advanced I/O function to do this. Advanced I/O Functions support Java and Nodejs. We'd need an API to insert into the Mapping table. We assume 'team' would be an ID for simplicity sake.
- //Used to insert rows into MappingTable
- //Takes a json object body with the keys OrderID, Team
- app.post("/row", (req, res) => {
- //initialise catalystApp
- const catalystApp = catalyst.initialize(req);
- //varaibles from json requestBody
- const requestBody = req.body;
- let order_id = requestBody.OrderID;
- let team = requestBody.Team;
- //initialise row data
- let rowData =
- {
- OrderID: order_id,
- Team: team
- };
- let datastore = catalystApp.datastore();
- let table = datastore.table('MappingTable');
- let insertPromise = table.insertRow(rowData);
- insertPromise.then((row) => {
- console.log(row);
- res.send({"Message":"Row inserted successfully"})
- }).catch((err) => {
- console.log(err);
- res.status(500).send(err);
- });;
- });
Now that we've inserted a mapping, we can use the GET API to get the respective mappings
- //Get team name when orderID is provided as input
- app.get("/row", async(req, res) => {
- let catalystApp = catalyst.initialize(req, {type: catalyst.type.applogic});
- const requestQuery = req.query;
- let order_id = requestQuery.order_id;
- let select_promise = await select_query(order_id,'SELECT Team FROM MappingTable where OrderID='+order_id+";",catalystApp,res);
- res.send({
- "Message":select_promise
- })
- }
Similarly, we'd need a function for assigning the ticket to the Department using the following API.
A neat trick is to try this in Postman and switch it to Nodejs code using the code option. Nodejs Connector can be used to generate the access token using the refresh token.
Step 3: Set up the Web Client
The Web Client can be built using Angular, React or Simple HTML, CSS and Javascript. We've set up a very simple web client. It's possible to set up better web clients that invoke the REST APIs according to your use case.
Please find attachment
Step 4: Set up the webhook
Configure a webhook from Zoho Desk to invoke the API URL according to requirements.
This entire solution can be thought of on three levels :
- First level: adding mappings one at a time
- Bulk addition of OrderID, Department Mappings
- CRON function to sync DepartmentID, Departmentname mapping
Feel free to write to us at support@zohocatalyst.com if you have any questions.
Topic Participants
Srividhya S
Announcements
Catalyst backs Vite.js!
Hi everyone, We're happy to support the open-source ecosystem that powers modern web development! If you’re building apps with Vite, Catalyst Slate is your go-to platform to deploy blazing-fast frontend apps with ease, scalability, and zero infrastructureCatalyst QuickML 2025 Year In Review
Hello everyone 👋 It’s been an exciting year for Catalyst QuickML. In 2025, as the Catalyst platform continued to expand its capabilities, QuickML focused on strengthening reliability, developer control, and operational readiness across the AI lifecycle.Introducing GenAI Features in Catalyst QuickML
Hi everyone, Building machine learning models can often feel slow and complex, especially when teams wait for perfect certainty before testing their ideas. But in reality, faster progress comes from early experimentation—trying out models quickly, learningAnnouncing Deprecation of Catalyst File Store, Event Listeners, and Cron
We would like to announce that the following Catalyst features are now in their deprecation phase and will reach End Of Life (EOL) on 30 April, 2026- Catalyst File Store Catalyst Event Listeners Catalyst Cron New users who sign up for Catalyst from todayReact Nexus 2025 Recap: Catalyst Slate in Action!
Hey Catalyst Community! We recently attended the React Nexus 2025 conference, an exciting gathering for frontend enthusiasts and React developers. Our team had an incredible time presenting and conducting a hands-on workshop on Catalyst Slate, our streamlined